
|
"It slimed me! God damn it! I'm covered in goo!" This article/section requires a clean up, you can help by removing unnecessary information, fixing up grammar/punctuation, and following the Manual of Style. If necessary take a look on the talk page to know what needs to be cleaned up. |
The Charger is a Special Infected introduced in Left 4 Dead 2.
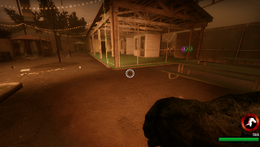
The Charger's main purpose is to separate a group of Survivors who are close together grabbing one and crashing into the rest of the group, sending them flying through the air. While he matches the Survivors' pace, he speeds up considerably when charging. However, the Charger cannot stop or turn during the charge until he hits a wall or travels a certain distance.
The Charger is voiced by Dee Bradley Baker.[1]
Appearance
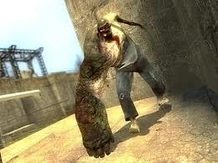
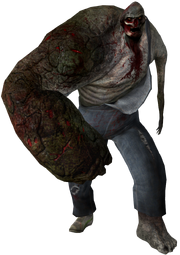
The Charger is a large Infected, close to the Tank in height and about half as wide. Unlike the Tank, the Charger's legs are capable of supporting all of its weight, and thus stands mostly upright. His hairless skin is a deep greenish-gray in color, and he wears bloodstained denim overalls with one broken strap and a green sneaker on his right foot. The charger is one of the only Infected seen wearing any kind of foot wear.
Extent of Mutations

The Charger, as seen in-game.
The Charger's mutations appear similar to the Tank's mutations in terms of increased muscle mass, though noticeably asymmetrical. Most notably, the Charger's right arm and shoulder have grown significantly and have increased in thickness, resulting in his right hand becoming a swollen lump with stubby fingers. His left arm, inversely, has atrophied to the point of being useless (possibly from his body breaking it down to add bulk to his right arm), hanging limply to the Charger's side and flapping around with every movement.
His legs are less visibly affected by mutation, with only his left leg gaining any sort of extra bulk (to the point of ripping his overalls) while the right leg's proportions remain normal. The leg mutations are possibly to balance the Charger, equalizing the weight distribution throughout the body and enabling him to move quite fast.
Due to the Charger's preferred method of attack, he has sustained multiple injuries, especially on his right arm―prolonged times of bashing and slamming into walls has made the flesh of the Charger's right arm thick with calluses, scabs, and scars. Most likely a result of his constant charging, the Charger's right half of his face is visibly damaged. His cranium is possessing a massive dent, lacks teeth, and half his face torn off, revealing his skull and jawbone. His nose is completely removed and has blood running from it, signalling massive trauma. Moreover, his dangling left arm shows signs of necrosis.
Like most other Special Infected, the Charger has a distinctive sound. He is loud, making noises vaguely similar to human speech and barking at enemies in a high-pitched tone. He will also screech upon spotting Survivors and release a roar like a charging bull when starting a charge.
Abilities

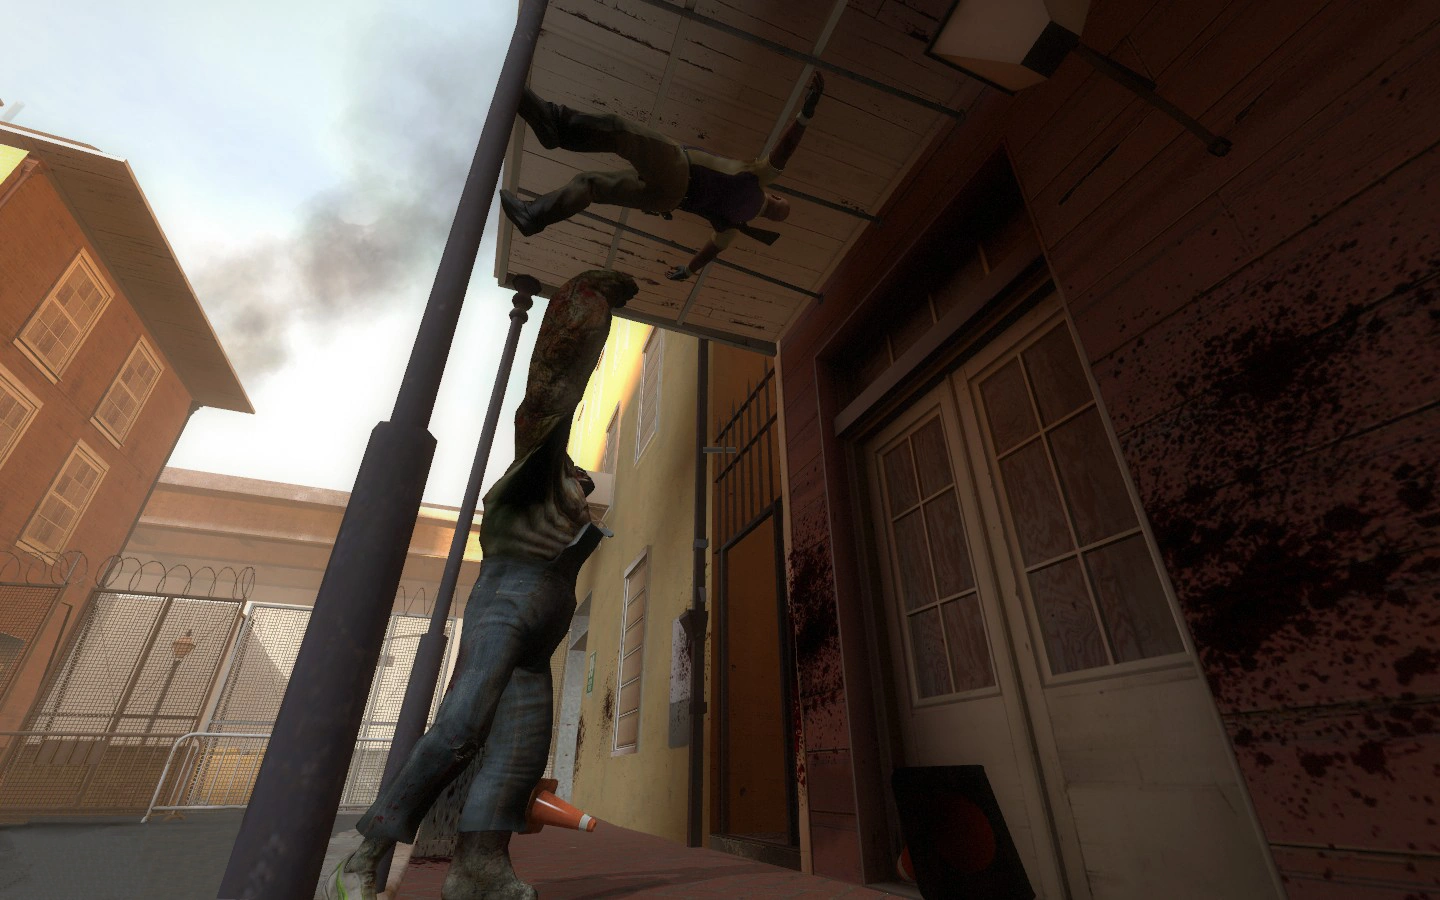
The Charger throwing Coach against the ceiling.
Note: The following damage is calculated on normal difficulty.
While charging, the Charger will run quickly forward with his right arm raised in front of him, using it to grab a Survivor. He will run faster than a Survivor with full health, and will grab the first Survivor he charges into, holding the Survivor out in front of himself while continuing to run through anything (including other Survivors) until he slams the Survivor into a solid object, doing 10 damage upon impact.
After that, he slams the Survivor into the ground in 1.5-second intervals until either the Survivor or the Charger himself is killed, during which time the Survivor is unable to move or attack. This ability does 15 damage per slam regardless of difficulty (possibly to balance its high health and melee-immunity, Chargers retain 15 damage on Expert). The Charger himself also appears to receive damage when he hits a solid object, although he will not receive any damage if he has a Survivor.[2]
Tactics
Infected

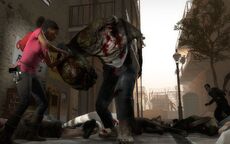
Rochelle faced with a Charger.
- A Charger player should always try to initiate coordinated attacks by the Special Infected, since his charge can knock over other Survivors and leave them vulnerable for other Special Infected to attack.
- Try to catch the Survivors in either an extremely narrow or extremely open space. A narrow space―such as a hallway―will allow you to knock over all the Survivors at once. An open area―such as The Park―lets you carry a Survivor far away from the group. This can be combined with a Jockey, Hunter, and Smoker to maximize disorientation and damage.
- If a long drop or lethal area is available, try to charge a Survivor into it for an instant kill.
- Chargers work well in ambush situations, as they can quickly take one Survivor far from the group and delay their saviors.
- Spawning too early may alert the Survivors to your presence prematurely due to the Charger's loud grunts and other noises, ruining the element of surprise necessary for a successful ambush.
- Choosing not to ambush Survivors can be a poor choice, due to the other team's ability to sidestep your charge and kill you. Ambushes will maximize your chance at successfully charging an enemy.
- Be sure to charge when there are no solid objects between you and your target; anything solid you hit will almost always stop your charge.
- Aim for the Survivor with the most health and try to carry that Survivor far from their teammates, as it will take longer for the weaker Survivors to help him/her due to their reduced walking speed unless they have a sniper rifle.
The Charger's point of view in Versus mode.
- Avoid charges from a long distance. The Survivors will react quickly enough to dodge you (unless they are distracted) or worse, stop you dead in your tracks. You may also not be able to carry them far enough from their allies to do substantial damage before you are killed.
- Chargers can begin their charge from a high place without stopping. Use this to deliver surprising ambushes.
- Certain drops, if they are high enough, may stop your charge if you land on a Survivor. You will still grab the Survivor, but they will not be carried from where you first hit them.
- The Charger can knock down doors instantly by charging into them. Use this to surprise Survivors on the other side.
- Try to snatch lone and/or healing Survivors. Charging a Survivor who is busy reviving an incapacitated teammate is also an effective tactic, especially since these Survivors will have to stop what they're doing and waste time, giving your teammates a chance to spawn in.
- The Charger does damage to whoever it grabs as well as any Survivors who are knocked aside. Knocked Survivors are unable to fire for several seconds, which means your main victim will take more damage before they can be rescued if you manage to hit multiple people.
- Survivors that are knocked aside might be incapacitated by hanging if they are close to a high ledge when they are hit. Alternatively, if they are knocked far enough past the ledge, they may fall to their deaths.
- A Boomer is a Charger's best friend. Attacking when Boomer bile has just covered the Survivors is a useful tactic. Aim for the Survivors who aren't covered, and if you carry them far enough away, you can cause significant damage before being killed.
- The Charger has the second most powerful melee attack of controllable infected, delivering a powerful 10 damage per strike, and is capable of punching once per second[3]. This high damage can be used to weaken or incapacitate injured survivors quickly, slowing the enemy team down.
- After killing a Survivor or being stumbled by an explosion, the Charger has no recharge time; due to this, you can immediately charge into another Survivor and separate the whole team.
- A good tactic to use with inexperienced players is to simply run up and start punching them when fully charged, thereby taking them by surprise when you charge them from a very short distance, making it impossible to miss.
- Don't charge from too close though; point-blank charges will do nothing except stumble the survivor and damage them slightly.
- Whenever possible, attempt to bowl through the Survivors when they are coming up an incline such as a stairs or a ramp. If hit correctly, the Survivors will take fall damage might even be incapacitated.
- If you notice a Jockey player in trouble while riding a Survivor, simply charge the Survivor in a direction that will save the Jockey player. Upon impact, with the Survivor, the Jockey will be launched similar to a Survivor being punched by a Tank or hit by a Charger who has already grabbed a victim. This can potentially save the Jockey and deal even more damage as well as cause more confusion. Also, if the Jockey lands on another Survivor, he or she may automatically ride that one instead of waiting for their ability to recharge.
- When in a small area with many exits (The Park in The Parish), don't charge. Your melee attack does a lot of damage and you can run away after hitting a Survivor. Save your charge for lone Survivors when it will take teammates a long time to come save their friend.
Survivors
- Locate the Charger before he charges so you can prepare to dodge its charge.
- Avoid situations where the Charger can knock you off a ledge or roof, as this can cause an instant incapacitation or death.
- Avoid using melee weapons to kill the Charger: it requires two hits (one to the head) which will leave time for you to be struck by the Charger's high damage punches.
- You can use a melee weapon to kill the Charger in one blow with a headshot during a charge if he is controlled by a player (Versus mode).
- However, this does not work against AI-controlled Chargers unless they have been damaged, because due to flaws in their AI behavior, they receive significantly reduced damage while charging for balance.
- You can use a melee weapon to kill the Charger in one blow with a headshot during a charge if he is controlled by a player (Versus mode).
- Fan out if you hear a Charger (but don't separate too far, or else the Infected can easily pick your teammates off). His ability to scatter close-knit Survivors will hinder your ability to save any pinned teammates. He can send you and your teammates flying, immobilizing you and them for a short period, making everyone vulnerable to Infected attacks.
- Chargers are immune to shove attacks, so don't bother shoving him if he is pummeling a Survivor; shoot or hit with a melee weapon.
- Avoid the Charger's melee attack; even when he misses the charge, he can still cause a lot of damage.
- Chargers are notorious for not charging when in Hordes and simply running up to the Survivors and punching them.
- If the Charger misses his charge, he will attempt to melee any nearby survivors.
- In campaigns like Swamp Fever, try to stay on dry land if you hear a Charger nearby, as the water slows you down and makes you an easier target to hit. This also gives the Charger a larger window of opportunity to do heavy damage to you before your fellow Survivors can reach you.
- The speed of the Charger is unaffected by water.
- The Charger is extremely vulnerable after missing a charge and this opportunity should be taken advantage of unless another Survivor has been pinned by other Special Infected. Shoot him to death while he is stumbling, or, if within a reasonable distance, use a melee weapon to take him out quickly.
- It is a good idea to aim for the head if you see a Charger. Landing hits against the vulnerable target will reduce the infected's high health much faster, making him less likely to do significant damage.
- The Charger also takes increased damage to his large mutated arm, a much easier target than the Charger's head.
- The Charger can only run a certain distance before his charge ends. This does not mean he is incapable of carrying a Survivor a great distance, however.
- Bot Survivors make almost no effort to evade the Charger, so try to keep them far away from any incoming charge.
Good Ambush Spots

The Charger.
As a general rule, always attack Survivors that are in a narrow area, in a straight line, or otherwise tight clump. Take advantage of the larger open areas; the further away you can take a Survivor, the harder it is for their team to rescue them. Your charge is deadly near ledges and cliffs.
Dead Center
- On The Hotel, if a Survivor is by a window that doesn't have a railing on the ledge, charge at them, and you should bring the Survivor to their death.
- On the first floor, try to pin them in the fire. You will survive for a while, and do a good amount of damage to your victim. If you can incapacitate them in the fire, the other Survivors will have a hard time saving them, losing plenty of health themselves.
- The fire between the kitchen and the main lobby does significantly increased damage, and if a Survivor is incapacitated in this fire they will die very fast. Teammates that are reviving the incapacitated survivor will take massive damage from the fire as well, and if the incapacitated survivor is far enough in the fire they will be incapacitated again before they can escape it. This fire is a very good spot to pin survivors.
- If you manage to get the Survivors on The Hotel's ledge, you can carry a survivor over the ledge to their death and potentially knock one or more additional survivors off as well.
- On The Streets, the best you can do is try to carry a Survivor far away from the group. There are plenty of good spots for this.
- Before the gun store, there is a long straight path to charge the Survivors with little room of dodging.
- While the Survivors climb a ladder on the dumpster, climb up and charge at them; this will usually knock all of them back.
- Inside The Mall, try to carry the Survivors off of the higher floors. Also try to split up the Survivors during the Crescendo Event; this could be fatal to the team.
- Escalators are always great points to choke off Survivors' progress. Wait for all of them to start going up/down, and as soon as the first Survivor reaches the end of the escalator, charge straight through the escalator and all of them. The teammates who are sent flying might receive fall damage.
- In The Mall during the Crescendo Event, you can either try to death charge the Survivors through the glass railings at the beginning or charge down the escalator when there are multiple Survivors running up it, as you'll likely knock one of them towards the bottom floor.
- Before the Survivors get to the stock car, try to grab them from the far side of the hallway they must go through.
- While the team is collecting gas, one Survivor might go off by themselves on the upper floors. You can knock them off the upper areas and incapacitate them instantly.
The Passing
- At the beginning of The Riverbank, try to charge a Survivor who wandered too close to the water's edge. There are a few low fence areas where a well-aimed charge can rush the Survivor into the river for an instant kill.
- When the Survivors come out of the building before the park, try to charge them over the broken fence and back into the streets. This will result in a long detour or one less survivor. Also, if you knock one into the streets from up there, it could result in an instant kill.
- In The Underground, there are many long areas that are ideal for charging; try to ambush a Survivor and carry them as far away as possible.
- In the building after the plank, try charging people who wander too close to a window. If you hit them from the top floor, you could kill them.
- During The Port, try to charge from the top of the stairs at the beginning. It you hit more than one at the top, you could kill them.
- Try to charge into Survivors bundled in groups while leaving Hunters or Jockeys to get daring Survivors who wander off. Although this might not hurt them much, with the help of a Smoker, you could easily incapacitate a group of two Survivors.
Dark Carnival
- In the motel, try to grab a Survivor that is on the upper walkway. Pull them off to delay and damage them. There's a very good point in the motel which is when the Survivors are forced to enter the motel rooms on the second floor. This is when the Survivors go through the broken walls in the second floor of the motel. If one of them exits through the window and your aiming is right, you can take them over the fence blocking access to the hill from the lower levels. As such, making them all go in a big circle back into the parking lot. Charging the last Survivor before he/she can jump down the hill into the swamp will cause your victim to be stranded, and will eventually perish.
- On The Motel, charge a Survivor all the way back down the hill near the end of the level. This will delay them considerably and do some damage if you can mow down the others.
- During The Fairgrounds, when the Survivors climb to the top of the building after Kiddie Land, there is a ramp behind the ladder that makes it possible to charge them back into Kiddie Land; this either makes them lose a lot of time or a Survivor.
- At the start of the Tunnel of Love when the Survivors open the safe room door and go up the stairs, charge from the opposite side of the stairs, slamming all of them into the wall and pummel the first Survivor you hit back into the safe room. A good variation on this is to spawn in the safe room, charge from the opposite direction towards the tunnel, because everyone is expecting a charge from the tunnel.
- On The Coaster, look for anyone who breaks away from the pack during the Crescendo and carry them even farther away from the others. There are also various areas along the actual rollercoaster where you can charge Survivors. Survivors are always closely packed while traveling the tracks; and so, one can easily charge, grab a Survivor, and knock the others to their deaths (do not spawn too early as the the coaster will kill you on contact).
- The rooftops in the fourth chapter of Dark Carnival, The Barns, are a great place to charge Survivors. A good charge will result in the Survivors flying everywhere.
- During The Concert, try to separate the Survivors, as always. This is especially useful during the Tank attack, when everyone would be focused on him instead of you. Veteran players though will try to kill any other threat, as a Survivor getting caught would mean one less gun to fight the Tank. Get players who use melee weapons or have deadly weapons first to make the Tank get rid of the Survivors more easier.
- Also try to punish Survivors who defend themselves on the scaffoldings. A well-aimed charge can incapacitate your victim. Once again, this is more advised during the Tank.
Swamp Fever
- In the Plank Country, when the Survivors are on the dock right before the Crescendo Event, try to grab, or better yet, knock one into the deep water. This will kill the Survivor you grabbed and the ones you hit instantly. Also, while the Survivors are on the walkways, try to get them to fall down into the swamp. This will slow them down considerably.
- In the Swamp, taking the Survivors into the water is useful because their team will be slowed down by the water. Also, at the airplane, wait for the Survivors to open the door and charge them down.
- On The Plantation, just before the Survivors go up the ladder, try carry them back down the way they came this will force them to backtrack and really annoy them. Also attack the Survivor who goes to answer the rescue vehicle. Also, if they hold out by the Heavy Machine Gun, grab a Survivor and carry them off the upper areas. You can also charge Survivors off the bridge to the rescue vehicle, causing them to die.
Hard Rain
(These attack spots apply to both the first and second trip.)
- After the Survivors enter The Milltown, there are multiple places you can carry a Survivor very far away from the pack.
- When the Survivors are on the upper floors of The Sugar Mill, try to knock them off of them. If they are on the highest floor, you'll kill them instantly.
- Try to charge a Survivor on the Mill Escape when they come out of the elevator. It is easier to charge them when they are coming out of the elevator than trying to charge them as they are going into the elevator on The Sugar Mill. On top of that confusion, a Smoker can pull one to hang, a Jockey/Hunter can pounce another, and the Spitter can cause massive chaos with this combination.
- Charge past or into Witches in The Sugar Mill. Survivors will, by instinct, shoot at you when they see you charge, and a few stray shots is all it takes to startle a Witch.
- Survivors tend to travel in straight lines when going through the cane field. Use this for a quick separation or scatter an entire team.
- Once the rain starts, take advantage of (and note of) the reduced movement speed of Survivors in water. Paying attention to this will make it easier to lead your attacks. If you can carry your victim out of the way and into a large area of water, it will significantly slow down the Survivors, as their teammate will have to catch up.
- Your primary goal in the return-to maps is not, actually, carrying the Survivors away, but knocking the others off the roofs. Survivors are fairly easy targets in the water, and it would be pretty hard to release the carried one from you. It is especially effective when the rain starts, as the Survivor is unlikely to survive something like that.
- In the finale, try catching the ones who went down into the Burger Tank for ammo. This won't hurt anyone a large amount, but will cause some attention, thus giving a chance for the Tank to come in and cause chaos.
- Also in the finale, charge Survivors off of the dock where the boat will eventually appear. If they fall into the water, they're dead.
- Many people are not aware that the Charger's attack will override a Smoker capture. With the permission of the human-controlled Smoker, of course, charge a Survivor while he/she is being constricted by a Smoker near the beginning/ending dock. Your charge will free the Survivor from the Smoker but also carry the Survivor into the deadly waters.
The Parish
- Right at the beginning of The Waterfront, charge at the first two Survivors that go up the gangway. If you can knock a Survivor upward into the water, your team shouldn't have much more trouble to finish the enemy team off.
- After the area with a jukebox is a place filled with several narrow spaces; make full use of the corners.
- When the Survivors are in The Park, there are multiple places you can attack the enemies and split them up by carrying them away from the group, such as the hedge maze.
- When the Survivors are doing The Park's Crescendo Event, charge one all the way back down one of the fenced-in alleys, giving the Horde time to attack.
- When the Survivors are about to enter the sewers before The Cemetery, hide in them and charge the first that you see. The sewer is a very large, open area, and the Survivors are slowed down by the deep water, making the trip to save your victim take a bit longer. You may also ambush the one who was about to be the last to enter the sewer, making an ideal attack position. It is best to have a Jockey and/or Smoker up above.
- Another great strategy on the Sewers is to have a Charger and a Spitter wait at the end of the tunnel for the Survivors. When all four are down in the Sewer have the Charger knock down all four and have the Spitter attack right as the Charger does. The spit will do a good amount of damage while the other Survivors are getting back up.
- In The Quarter, during the Float crescendo event, get atop of the building the Survivors need to enter, line up with the moving platform and charge; they won't expect it; you'll knock them, slow them down, and do major damage including falling and charging damage.
- On The Bridge, hide behind vehicles and wait. If you can grab a Survivor and carry them off of the bridge in any way, they'll be dead in the water.
- Even if you don't bring the Survivor off, if any of their friends are close to the edge, the impact can send them off the bridge.
- On The Helipad at the end the survivors are always trying to get into the chopper use this to your advantage and charge at least one off killing them or sending them to their death in the water.
Achievements
- See Main Article: Achievements
Survivors
 |
LEVEL A CHARGE | (15G) |
| Kill a Charger with a melee weapon while they are charging. | ||
Infected
 |
SCATTERING RAM | (20G) |
| As the Charger, bowl through the entire enemy team in a single charge. | ||
 |
MEAT TENDERIZER | (20G) |
| As the Charger, grab a Survivor and smash them into the ground for a solid 15 seconds. | ||
 |
LONG DISTANCE CARRIER | (15G) |
| As the Charger, grab a Survivor and carry them over 80 feet. | ||
 |
WEDDING CRASHER | (30G) |
| As the Charger, grab a Survivor and crash them through 8 chairs at the wedding. | ||
Behind the Scenes

The temporary Charger model.
Concept art shows that the developers had planned for the Charger to be either a large zombie with an armored upper skull yet tiny T. rex arms or a "tripod" doglike animal. Traits of both can be seen in the final version: the Charger has three functional limbs and one floppy tiny arm, as well as an exposed skull.
Before the Charger's design was finalized, it used a re-skinned Hunter model so that the team could test out how the Charger would play while the art team was designing it. When the Charger design was finished, as like any other Infected, they recorded temporary sounds. The Charger's temporary warning call was "AY! AY! AY!", as said in the Developer's Commentary.
Originally, the Charger had many different series of attacks and has gone through multiple versions with different twists on his charge attack. In one version of his build, his charge attack caused him to trample over Survivors rather than grab them, and his melee attack was replaced with an overhead strike that smashed the Survivor to the floor before the Charger started pounding them. This behavior can be seen here. In another build, the Charger used his mutated arm to lunge forward (as if it was a one-armed simian) repeatedly. At this point in the game, the Charger would stop after grabbing a Survivor; however, when the Charger could carry the first Survivor they tackled, this animation was cut.
When most of the Charger's model was finalized, he had a much more bloody and gaunt face that exposed his skull.[4]
Notes
- Sounds used by the Charger at Comic Con are re-used ambient sounds from various sections of Ravenholm in Half-Life 2. In addition, the Charger's roars and grunts seem to be remixed or altered versions of that game's Poison Headcrab Zombie.
- On the image of the "Meat Tenderizer" achievement, the Charger's left arm is mutated and big instead of the right arm.
- When slamming Survivors into the ground, the Survivor will struggle when brought up. When they are incapacitated, however, they will be limp when brought up.
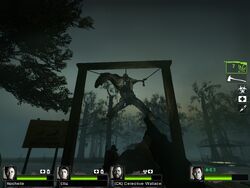
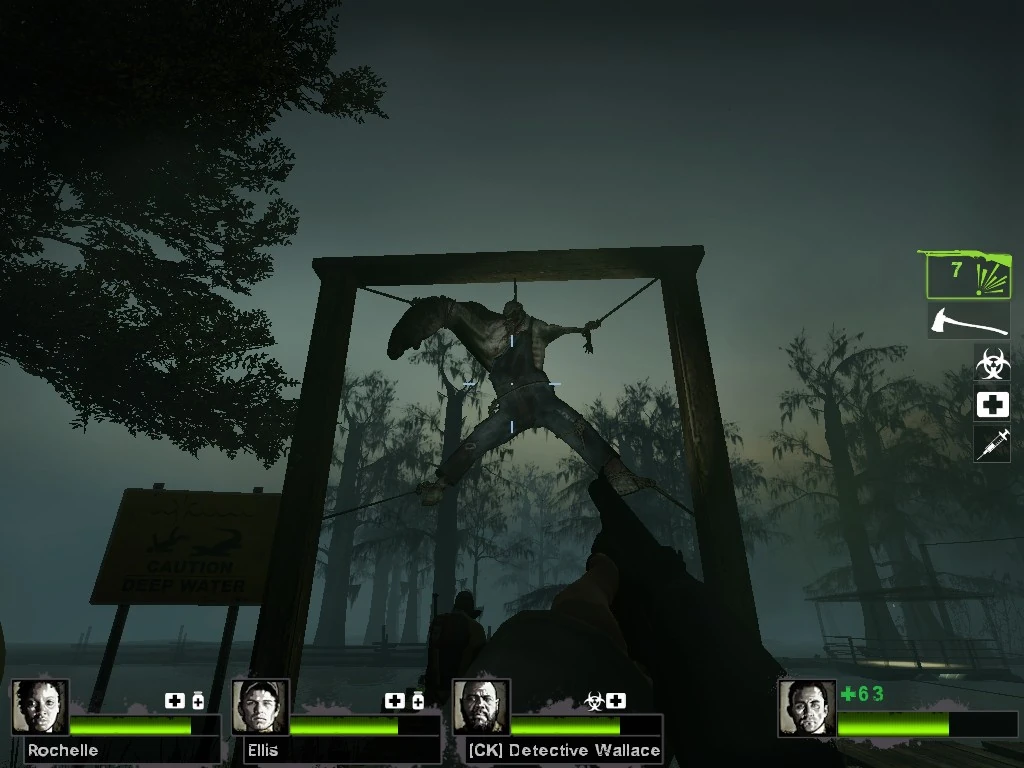
The hung Charger, forming a Lambda figure
- A Charger can be seen hung up by his limbs in the first chapter, Plank Country, of the Swamp Fever campaign. He is hung in the shape of the Greek character Lambda, which serves as the logo for the Half-Life series.
- The Charger has multiple pinning animation depending on his surroundings where one of the following can happen:
- If you are in an open area, he will just slam you against the ground repeatedly.
- If you are next to a wall, car, or other obstacle, he will alternate between slamming you into the ground and ramming you into the obstacle.
- If you are in a building, he will alternate between slamming you into the ground and slamming you into the ceiling.
- If you are in a building next to a wall, he will alternate slamming you into the ground, wall, and ceiling.
- If another Special Infected is in spawn mode and they stand near a Charger when it hits a wall or object, they will stumble as if they have already spawned.
- It is odd that the Charger is capable of stumbling and tossing Survivors through the air after charging through them, despite being unable to tear down breakable walls with its charge ability.
- If an AI controlled Charger spawns, sometimes he will not move until he can see you. This means if his large arm is poking out, you can shoot at him and he will not retaliate. The same happens when shooting him from a window.
- If a Survivor is stumbled by a Charger, they can continually swap weapons, though they won't be able to use it until they regain their balance. This also goes with the Boomer when it explodes and a Survivor is caught in the blast radius.
- The Charger is the second most favored of the Special Infected (according to the Blog Post on Friday May 28th 2010), coming in second with 17% of the votes, with the Hunter narrowly winning at 20%.
- The Charger, along with the Boomer, are the only two Special Infected that do not appear in The Sacrifice trailer.
- The Charger can cause a strange glitch if he charges a Survivor while they are mounted on a Heavy Machine Gun. The Survivor can still fire the gun and won't be seen as being pounded, but the Charger will still be damaging the Survivor. When the Charger is killed and the Survivor dismounts from the gun, the camera will shift to third-person view and play the animation of the Survivor getting up after being released from the Charger.
- Judging by the concept art, the Charger has gone through the most design changes. This is yet to be confirmed, because the L4D1 Special Infected may have other concept art.
- The Charger seems to be aware of its high-damage melee attack, as it will punch any Survivor that are greatly hurt, then charge any healthier ones. If all Survivors are in green health, it will rapidly attempt to melee the closest one it can find.
- Sometimes, when an AI Charger has begun to charge, if it grabs a victim, it might go backwards instead of forward. The same also applies if it fails to grab a victim and it starts to run backwards, though the Charger seems to be backwalking at a fast speed.
- If you charge into a spawned Special Infected, you may be able to actually kill it. This can be seen here at 6:07.
- In rare cases, the Charger can hurl Survivors into areas where they would not be able to reach with normal means (e.g. a Survivor can be thrown onto the top of a wall). This can usually bring advantages as the Survivor can eliminate the Infected in an elevated/hard-to-reach location, provided that he/she had sufficient health to survive.
- Apparently, all Chargers encountered in-game have their right arm/hand affected by the infection while their left arm is vestigial. No "left-handed" Chargers will be encountered.
- In many situations, the Charger's right arm clips through walls and doors (when breaking it down). This gives human players an advantage to shoot it down quickly. In fact, its hit-box tends to stick outside a door thus the Survivors can use a melee weapon and quickly take down the Charger without too much trouble.
- As its body is disproportionately created, the Charger leans to its right when moving, probably to maintain balance.
- A.I. Chargers are unable to distinguish the difference in altitude of its targets (e.g. An A.I. Charger will try to ram a Survivor who is located one floor up).
Gallery
See image archive for more images...
")
")
")
")
")
")
")
")
")
")
")
")
")
")
")
See Also
References
- ↑ Dee Bradley Baker (2014-01-09). I voiced Jockey, Charger & the Spitter in L4D2. Such fun!!. Retrieved on 2014 March 13.
- ↑ http://www.youtube.com/watch?v=nxwlazOOX2E
- ↑ http://www.youtube.com/watch?v=nxwlazOOX2E
- ↑ http://www.gametrailers.com/video/e3-09-left-4-dead/50357
External Links
- The Charger: http://www.l4d.com/infected/charger/
- IGN Video: Left 4 Dead 2 PC Games Gameplay - E3 2009: Axe Ownage, where a Charger can be briefly seen at 0:06.
- Concept art for the Charger: http://www.left4dead411.com/forums/showthread.php?t=12827
- Charger in gameplay: http://www.youtube.com/watch?v=2FyNc57Fsks
- Gameplay as Charger: http://xbox360.ign.com/dor/objects/14352241/left-4-dead-2/videos/l4d2_gmp_charger.html
| The Infected | ||||||
| Playable | ||||||
| Introduced in Left 4 Dead | Introduced in Left 4 Dead 2 | |||||

|

|

|

|

|

|

|
| The Boomer | The Hunter | The Smoker | The Tank | The Charger | The Jockey | The Spitter |
| Non-Playable | ||||||
| Introduced in Left 4 Dead | Introduced in Left 4 Dead 2 | Cut Infected | ||||

|

|

|

| |||
| The Witch | Common Infected | Uncommon Infected | The Screamer | |||